- A knife with a long, bendable blade.
- A sharp razor blade with holder (or equivalent) for cleaning/ scraping.
- Acetone and a dry cloth.
Mobile Antenna ComponentsGF-RK
Reinstallation Kit for GlassFix® Antennas Operating Below 500 MHz
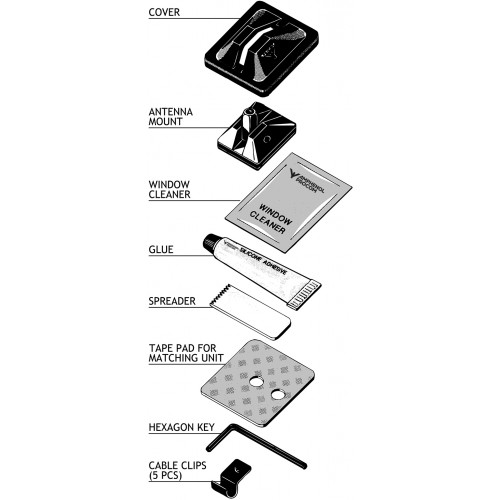
Description
The GF-RK GlassFix® reinstallation kit contains all new parts necessary to reinstall a GlassFix® antenna. The following tools are necessary:
1. Dismantling an Existing Installation
- The external antenna mount and the internal matching unit are removed using a knife with a long, bendable blade. While bent, the knife blade is led in between the glass surface and the unit to be removed, and with slow, twisting movements the units can be easened off.
- The above process usually leaves a bit of silicone glue on the glass. These remnants are easily removed using a sharp razor blade, preferably on a holder.
- The old cover and mount are scrapped.
- Finish up by cleaning the glass surface with acetone.
2. Regenerating the Glassfix® Antenna
- Strip off the double adhesive tape remains on the matching unit. The old tape may stick very effectively to the printed circuit board surface, and the tape may have to be scraped off carefully with a knife.
- Clean the exposed surface with acetone and mount the new double-sided tape-pad from the “GF-RK” kit on the unit. Align the tape carefully while fixing it.
- The antenna is now re-established and can be mounted following the normal GlassFix®mounting procedure.
Reinstallation
1. Before installation
- When selecting mounting location take into consideration: positions of back view mirror, wiper blade paths and defogger wires (when mounting on rear window). The driver’s view should not be obstructed.
- Max. allowed curvature of the glass surface on the mounting spot is 2 mm deflection per 100 mm length.
- Environmental- and car temperature must be above 15 °C at installation, and surfaces to be glued must be dry and clean.
2. Installation

Do not use sealer on rubber gasket or other places.
3. After Installation
- Allow the silicone gluings to dry off 2 hours at a temperature above 15 °C. To ensure full strength of the glue, it is recommended to keep the whip off the mount for 24 hours.
4. Tuning Instructions
- Insert a forward/reflection-type wattmeter between the transmitter and the antenna.
- Key the transmitter and observe the forward and the reflected power.
- Adjust the tuning screw on the matching unit until minimum returned power is obtained.
Warning
Safety Precautions
Antennas mounted on the windscreen may cause relatively high field strengths in the passenger cabin and near the dashboard.
1. To prevent health hazard due to RF radiation, persons must not be closer than 30 cm to the antenna whip (transmitter output power to the matching unit: 20 W). (DIN 57 848).
2. The RF signals at the dashboard may cause interference in the car’s electronic equipment such as broadcast radio, computer automatics, braking systems, electronic ignition, relays etc. Some cars are more susceptible to disturbances than others.It is the responsibility of the installer to carry out a thorough check of the proper functioning under any conditions of such circuits before finishing installation.
The enclosed silicone adhesive contains acetic acid and fungicides. Keep out of reach of children and dispose properly.
Related products

Braided Cables
Amphenol Procom a wide collection of Braided Cables which includes different RG Coaxial Cable models with low loss or ultra low loss. View our products here.

Compact Combiners
View all Amphenol Procom hybrid Tx/Rx Compact combiners for VHF & UHF. To be used e.g. in mobile TETRA/PMR/LMR control stations. Learn more.

Danmike
Amphenol Procom have a comprehensive range of different types of Danmike microphones for various situations and applications. View our product line here.

Mobile Mounts
Amphenol Procom offer a large collection of Mobil Mounts to suit our antennas that cover a frequency range between 0-2400 MHz plus. View our products here.